
Version information
This version is compatible with:
- Puppet Enterprise 2025.3.x, 2025.2.x, 2025.1.x, 2023.8.x, 2023.7.x, 2023.6.x, 2023.5.x, 2023.4.x, 2023.3.x, 2023.2.x, 2023.1.x, 2023.0.x, 2021.7.x, 2021.6.x, 2021.5.x, 2021.4.x, 2021.3.x, 2021.2.x, 2021.1.x, 2021.0.x, 2019.8.x
- Puppet >= 6.16.0 < 9.0.0
- AlmaLinux,AmazonLinux,Debian,OracleLinux,RedHat,RockyLinux,SLES,Ubuntu
Start using this module
Add this module to your Puppetfile:
mod 'puppetlabs-splunk_hec', '2.1.0'Learn more about managing modules with a PuppetfileDocumentation
splunk_hec
Table of Contents
- Overview
- Requirements
- Installation
- Custom Installation
- SSL Configuration
- Fact Configuration
- Customized Reporting
- Tasks
- Advanced Settings
- FIPS Mode
- Advanced Topics
- Known Issues
- Breaking Changes
- Release Process
Overview
This module provides three services to Puppet and Splunk users.
-
A report processor to allow sending Puppet Agent run reports to Splunk. When a Puppet agent completes a run and submits some of the report data to Puppet, this module's processor can be invoked to send that report to Splunk. After this module is installed in your environment, to enable sending node reports to Splunk, do the following:
- Classify your Puppet Servers with the
splunk_hecclass. - Set the
urlparameter which refers to your Splunk Hec url. - Set the
tokenparameter which will be the HEC token you create in Splunk. - Set the
enable_reportsparameter to true.
For more advanced configuration options including sending reports based on specific conditions see the Customized Reporting section below.
- Classify your Puppet Servers with the
-
A fact terminus to submit node facts to Splunk. See Fact Terminus Support for details.
-
A PE Event Forwarding processor for sending data received from the PE Event Forwarding module to Splunk. This data can include the details of Task and Plan executions that were initiated by the Puppet Orchestrator (clicking execute task|plan from the console or puppet command line), or it can be events from rbac, the node classifier, the console, or code-manager. To enable this feature, after the PE Event Forwarding module has been configured, set the
events_reporting_enabledparameter on thesplunk_hecclass to true.Note: This is a PE only feature and depends on the PE Event Forwarding module being installed and classified on the Puppet Server nodes in your environment. Please see the documentation in that module for details on how to install and configure that module.
There is also the Puppet Alert Actions app, which contains the alert actions that were previously shipped in the Puppet Report Viewer:
The Puppet Alert Actions app allows you to run custom Tasks in Puppet Enterprise or retrieve detailed Report information about a particular Puppet Event that would be sent to the Puppet Report Viewer. For additional information on configuring Puppet Alert Actions, please see our documentation located here.
There are two Tasks included in this module, splunk_hec:bolt_apply and splunk_hec:bolt_result, that provide a pre-packaged way to compose Bolt Plans that submit data to Splunk every time they are run. Example plans are included which demonstrate task usage.
Requirements
- Puppet Enterprise (PE) or Open Source Puppet
- Splunk
This was tested on the Puppet Enterprise LTS release, Puppet 7 and Puppet 8, using stock gems of yaml, json, and net::https.
- While most of this module is PE and Open Source, using the PE Event Forwarding processor is PE only because it gathers data from API's that exist only in Puppet Enterprise.
Installation
Instructions assume you are using Puppet Enterprise. For Open Source Puppet installations please see the Custom Installation section.
- Install the Puppet Report Viewer app in Splunk if not already installed.
- Please see Splunk Installation if you need to install Splunk.
- Alternatively you can install Splunk via Bolt.
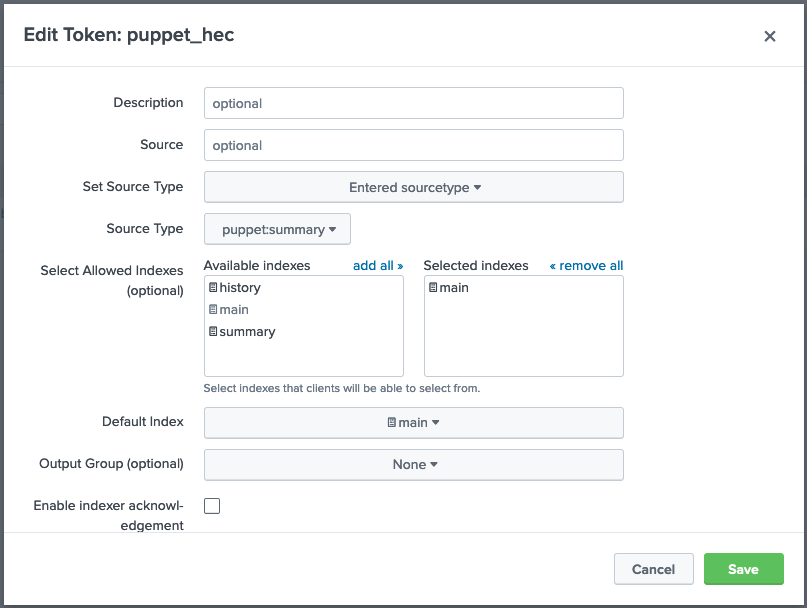
- Create an HEC token in Splunk:
-
Navigate to
Settings>Data Inputin your Splunk console. -
Add a new
HTTP Event Collectorwith a name of your choice. -
Ensure
indexer acknowledgementis not enabled. -
Click Next and set the source type to Automatic.
-
Ensure the
App Contextis set toPuppet Report Viewer. -
Add the
mainindex -
Set the Default Index to
main. -
Click Review and then Submit.
-
When complete the HEC token should look something like this:
- Install the module and add the
splunk_hecclass to the PE Master node group.
-
Install the
splunk_hecmodule on your Puppet Primary Server.puppet module install puppetlabs-splunk_hec
-
In the PE console, navigate to
Node groupsand expandPE Infrastructure. -
Select
PE Masterand navigate to theClassestab. -
Add the
splunk_hecclass. -
Configure the following parameters:
enable_reports = true manage_routes = true token = <TOKEN GENERATED IN STEP 2> url = something like https://splunk-8.splunk.internal:8088/services/collector -
Commit the changes.
-
Run Puppet on the node group; this will cause a restart of the
pe-puppetserverservice.
- Log into the Splunk console and search
index=* sourcetype=puppet:summary, if everything was done properly you should see the reports from the systems in your Puppet environment.
Source Types
-
puppet:summaryPuppet agent node reports.
-
puppet:factsNode facts sent by the facts terminus enabled by setting
manage_routesto true. -
puppet:jobsEvents gathered from the Puppet Jobs API
The following source types all refer to different types of events gathered from the Puppet Activities API
-
puppet:activities_rbacRBAC events such as creating and/or modifying users or groups, and user logins.
Note: RBAC events can be disabled from the pe_event_forwarding module for performance reasons. Ensure the
disable_rbacparameter is set to false in the pe_event_forwarding module if you wish to send RBAC events to Splunk. -
puppet:activities_classifierClassifier events such as creating node groups, or modifying the properties of node groups.
-
puppet:activities_consoleConsole events such as requesting Task or Plan runs via the console.
-
puppet:activities_code_managerCode manager events.
Custom Installation
Please Note: If you are installing this module using a
control-repoyou must havesplunk_hecin your production environment'sPuppetfileso the Puppet Server process can properly load the required libraries. You can then create a feature branch to enable them and test the configuration, but the libraries must be inproduction; otherwise the feature branch won't work as expected. If your Puppet Server is in a different environment, please add this module to thePuppetfilein that environment as well.
The steps below will help install and troubleshoot the report processor on a standard Puppet Primary Server; including manual steps to configure compilers (Puppet Servers), and to use the included splunk_hec class. Because one is modifying production machines, these steps allow you to validate your settings before deploying the changes live.
-
Install the Puppet Report Viewer app in Splunk. This will import the needed source types to configure Splunk's HTTP Endpoint Collector (HEC) and provide a dashboard that will show the reports once they are sent to Splunk.
-
Create a Splunk HEC Token or use an existing one that sends to
mainindex and does not have acknowledgement enabled. Follow the steps provided by Splunk's Getting Data In Guide if you are new to HTTP Endpoint Collectors. -
Install this Puppet module in the environment that your Puppet Servers are using (e.g.
production). -
Run
puppet plugin downloadon your Puppet Servers to sync the content. Some users with strict permissions may need to runumask 022first.
-
Please Note: If permissions are too restrictive you may see the following error in the Puppet Server logs:
Could not find terminus splunk_hec for indirection facts
- Create
/etc/puppetlabs/puppet/splunk_hec.yaml(see the examples directory), adding your Splunk Server URL to theurlparameter (e.g.https://splunk-dev:8088/services/collector) and HEC Token created during step 2 to thesplunk_tokenparameter.
-
You can add
timeoutas an optional parameter. The default value is1second for both open and read sessions, so take value x2 for real world use. -
PE Only: Provide the
pe_consoleparameter value. This is the FQDN for the PE console, which Splunk can use to lookup further information if the installation utilizes compilers (it is best practice to set this if you're anticipating scaling the installation in the future).--- "url" : "https://splunk-dev.testing.local:8088/services/collector" "token" : "13311780-EC29-4DD0-A796-9F0CDC56F2AD"(Note: If Disaster Recovery is enabled you will need to ensure these settings exist on the Replica node as well. This is often done through the
PE HA Replicanode group.)
-
Run
puppet apply -e 'notify { "hello world": }' --reports=splunk_hecfrom the Puppet Server, this will load the report processor and test your configuration settings without actually modifying your Puppet Server's running configuration. If you are using the Puppet Report Viewer app in Splunk then you will see the page update with new data. If not, perform a search by thesourcetypeyou provided with your HEC configuration. -
If configured properly the Puppet Report Viewer app in Splunk will show 1 node in the
Overviewtab. -
Now it is time to roll these settings out to the fleet of Puppet Servers in the installation. For PE users:
- In the PE console, navigate to
Node groupsand expandPE Infrastructure. - Select
PE Masterand navigate to theClassestab. - Click Refresh to ensure that the
splunk_hecclass is loaded. - Add new class
splunk_hec. - From the
Parameterdrop down list you will need to configure at leasturlandtoken, providing the same values from the testing configuration file.- Optionally set
enable_reportstotrueif there isn't another component managing the servers reports setting. Otherwise manually addsplunk_hecto the settings as described in the manual steps below.
- Optionally set
- Commit changes and run Puppet. It is best to navigate to the
PE Certificate Authoritynode group and run Puppet there first, before running Puppet on the remaining nodes.
- For Inventory support in the Puppet Report Viewer, see Fact Terminus Support.
Manual Steps:
-
Add
splunk_hectoreportsunder the[master]configuration block in/etc/puppetlabs/puppet/puppet.conf:[master] node_terminus = classifier storeconfigs = true storeconfigs_backend = puppetdb reports = puppetdb,splunk_hec -
Restart the
pe-puppetserverprocess (puppet-serverfor Open Source Puppet) for it to reload the configuration and the plugin. -
Run
puppet agent -ton an agent; if you are using the suggested name, usesource="http:puppet-report-summary"in your Splunk search field to show the reports as they arrive.
SSL Configuration
Configuring SSL support for this report processor and tasks requires that the Splunk HEC service being used has a properly configured SSL certificate. Once the HEC service has a valid SSL certificate, the CA will need to be made available to the report processor to load. The supported path is to install a copy of the Splunk CA to a directory called /etc/puppetlabs/puppet/splunk_hec/ and provide the file name to splunk_hec class.
You can manually update the splunk_hec.yaml file with these settings:
"ssl_ca" : "splunk_ca.cert"
Alternatively, you can create a profile class that copies the splunk_ca.cert as part of invoking the splunk_hec class:
class profile::splunk_hec {
  file { '/etc/puppetlabs/puppet/splunk_hec/splunk_ca.cert':
    ensure => file,
    owner  => 'pe-puppet',
    group  => 'pe-puppet',
    mode   => '0644',
    source => 'puppet:///modules/profile/splunk_hec/splunk_ca.cert',
  }
}
Note: When splunk_hec::ssl_ca is configured it takes precendence over the system certificate store. The report processor will build its own cert store with the provided CA certificate to validate requests against the Splunk HEC endpoint. Alternatively, you can add the Splunk HEC CA to the system certificate store and set splunk_hec::include_system_cert_store to true. This will allow the code to ONLY use the system default store to perform certificate validation.
Fact Configuration
The following parameters are utilized to configure which facts (including custom facts) you would like to send to Splunk:
facts_allowlistfacts_blocklist(Optional)
To configure which facts to collect add the facts_allowlist parameter to the splunk_hec class and modify the array of facts presented.
- To collect all facts available at the time of the Puppet run, add the special value
all.factsto thefacts_allowlistarray. - When collecting all facts, you can configure the optional parameter
facts_blocklistwith an array of facts that should not be collected.
PE Event Forwarding
PE Customers can install the puppetlabs-pe_event_forwarding module to gather events from the Puppet Orchestrator API and from the Activities API, and then use this module to process that data and send it to Splunk. To enable this feature in a standard installation where this module is already classified to a Puppet Server node and sending reports to Splunk:
- See the documenation for
puppetlabs-pe_event_forwardingfor details on installing and configuring that module. That module will need to be installed and configured before moving on to the next step. - Set the
events_reporting_enabledparameter totrue.
By default the event_types parameter is configured to send all event types. You can choose which event types to send by setting this parameter to one or more of orchestrator, rbac, classifier, pe-console, or code-manager.
Filtering Event Data
To filter the event data, one can set the following parameters:
orchestrator_data_filterrbac_data_filterclassifier_data_filterpe_console_data_filtercode_manager_data_filter
The default (no filter set) will send all the data received from the event type. The filters must begin with the top level keys of the event data. One can look at the data in Splunk to see/determine what the top level keys are in the event data.
The format of setting these filters is an array of strings and within the string, you separate the different properties of a single path with a dot . and continue till the desired value.
Here's an example of a correctly constructed filter:
['options.scope.nodes', 'report.id', 'environment.name']
NOTE:
- You cannot step into arrays. The result of attempting this will return the selected key containing the array as a key of an empty hash.
- If a key selected does not exist (ie.
['options.foo']), it will return the key with anullvalue. - If there are two incorrect keys such as
['options.foo.baz'], it will query only up until the first invalid key and return the first incorrect key as an empty hash.
Sending from Non Server Nodes
This feature can be configured to send these events from non server nodes if needed. To do this, on the chosen server:
-
Classify and configure the
puppetlabs-pe_event_forwardingaccording to that module's documentation. -
Classify this module with the following parameter values:
class {'splunk_hec':
  events_reporting_enabled => true,
  url                      => "http://<splunk server name>:8088/services/collector/event",
  token                    => '<splunk token>'
}
Note: This manifest shows an end point with no SSL protection. To do SSL validation with this module you will have to do all of the steps detailed in the SSL Configuration section, but ensuring you copy the certificate to the correct location on the chosen server where you are classifying
splunk_hecandpe_event_forwarding, not the Puppet Server.
Supported Puppet Versions For Event Forwarding
The puppetlabs-pe_event_forwarding module that this feature depends on requires PE versions 2021.2 and above to access the API methods for the module to function properly.
Customized Reporting
As of 0.8.0 and later the report processor can be configured to include Logs and Resource Events along with the existing summary data. Because this data varies between runs and agents in Puppet, it is difficult to predict how much data you will use in Splunk as a result. However, this removes the need for configuring the Detailed Report Generation alerts in Splunk to retrieve that information; which may be useful for large installations that need to retrieve a large amount of data. You can now just send the information from Puppet directly.
Add one or more of these parameters based on the desired outcome, these apply to the state of the puppet runs. You cannot filter by facts on which nodes these are in effect for. As such, you can get logs when a puppet run fails, but not logs when a windows server puppet run fails.
By default this type of reporting is not enabled.
Parameters:
event_types (Requires puppetlabs-pe_event_forwarding module)
Array: Determines which event types should be forwarded to Splunk. Default value includes all event types. This can be one, or any of the following:
classifiercode-managerorchestratorpe-consolerbac
include_logs_status
Array: Determines if logs should be included based on the return status of the puppet agent run. This can be none, one, or any of the following:
failedchangedunchanged
include_logs_catalog_failure
Boolean: Include logs if a catalog fails to compile. This is a more specific type of failure that indicates a server-side issue.
truefalse
include_logs_corrective_change
Boolean: Include logs if a there is a corrective change (a PE only feature) - indicating drift was detected from the last time puppet ran on the system.
truefalse
include_resources_status
Array: Determines if resource events should be included based on the return status of the puppet agent run. Note: This only includes resources whose status is not unchanged - not the entire catalog. The can be none, one, or any of the following:
failedchangedunchanged
include_resources_corrective_change
Boolean: Include resource events if a there is a corrective change (a PE only feature) - indicating drift was detected from the last time puppet ran on the system.
truefalse
only_changes
Boolean: Only process reports when the report status indicates there were changes.
truefalse:: Default Value
summary_resources_format
String: If include_resources_corrective_change or include_resources_status is set and therefore resource_events are being sent as part of puppet:summary events, we can choose what format they should be sent in. Depending on your usage within Splunk, different formats may be preferable. The possible values are:
hash:: Default Valuearray
Here is an example of the data that will be forwarded to Splunk in each instance:
hash:
{
  "resource_events": {
    "File[/etc/something.conf]": {
      "resource": "File[/etc/something.conf]",
      "failed": false,
      "out_of_sync": true
    }
  }
}
array:
{
  "resource_events": [
    {
      "resource": "File[/etc/something.conf]",
      "failed": false,
      "out_of_sync": true
    }
  ]
}
Tasks
Two tasks are provided for submitting data from a Bolt plan to Splunk. For clarity, we recommend using a different HEC token to distinguish between events from Puppet runs and those generated by Bolt. The Puppet Report Viewer app includes a puppet:bolt sourcetype to faciltate this. Currently SSL validation for Bolt communications to Splunk is not supported.
-
splunk_hec::bolt_apply: A task that uses the remote task option to submit a Bolt Apply report in a similar format to thepuppet:summary. Unlike the summary, this includes the facts from a target because those are available to bolt at execution time and added to the report data before submission to Splunk. -
splunk_hec::bolt_result: A task that sends the result of a function to Splunk. Since the format is freeform and dependent on the individual function/tasks being called, formatting of the data is best done in the plan itself prior to submitting the result hash to the task.
To setup, add the splunk_hec endpoint as a remote target in your inventory.yaml file:
---
nodes:
  - name: splunk_bolt_hec
    config:
      transport: remote
      remote:
        hostname: <hostname>
        token: <token>
        port: 8088
See the plans directory for working examples of apply and result usage.
Advanced Settings
The splunk_hec module also supports customizing the fact_terminus and facts_cache_terminus names in the custom splunk_routes.yaml it deploys. If you are using a different facts_terminus (i.e. not PuppetDB), you will want to set that parameter.
If you are already using a custom splunk_routes.yaml, these are the equivalent instructions of what the splunk_hec module does. The most important setting is configuring cache: splunk_hec.
-
Create a custom
splunk_routes.yamlfile to override where facts are cached:--- master: facts: terminus: puppetdb cache: splunk_hec -
Set this routes file instead of the default one by running the following commmand:
puppet config set route_file /etc/puppetlabs/puppet/splunk_routes.yaml --section master
FIPS Mode
This module has some limitations in a FIPS environment. In particular, the SSL configuration steps and the available parameters are different under FIPS.
The CA certificate PEM file must be appended to the end of the localcacert file. Find the path to the file by running puppet config print localcacert. Keep in mind that this file will be overwritten any time the puppetserver is upgraded to a new version and this step will have to be done again. Consider copying a backup of this file to a safe location before attempting to add content to it until correct functioning of the Puppet Server and this module can be validated.
ca_file=$(puppet config print localcacert)
cp $ca_file ~/$ca_file
cat my_splunk_hec_ca.pem >> $ca_file
The module must use a different FIPS compliant HTTP client. This client currently lacks support for a number of configurable options. For example, none of the timeout parameters will have any effect. Additionally, ignoring the system certificate store is the default behavior, so there is no need to use the ignore_system_certificate_store parameter. When running in a FIPS environment the following optional parameters are available:
Note: These parameters only have an effect on metrics and will be ignored by the report processor when sending reports and facts.
fips_crl_check
Boolean: In FIPS mode, the HTTP Client will attempt to check the Splunk CA against the Splunk CRL. Unless the Splunk HEC endpoint is configured with a certificate generated by the Puppet CA, set this parameter to false to allow metrics to successfully send.
true:: Default Valuefalse
fips_verify_peer
Boolean: In FIPS mode, the HTTP Client will attempt peer verfication by default. When utilizing a self-signed certificate set this parameter to false to allow metrics to successfully send.
true:: Default Valuefalse
NOTE
To set up a testing environment with FIPS enabled, run the following command: PROVISION_LIST=fips_acceptance bundle exec rake acceptance:setup
Advanced Topics
- Advanced Puppet Configuration
- Advanced Splunk Configuration
- Fact Terminus Support
- Puppet Metrics Collection
- Troubleshooting and Verification
Known Issues
- Integration with the
puppet_metrics_collectionrequires version>= 6.0.0. - SSL Validation is under active development and behavior may change.
- Automated testing could use work.
>= 0.9.0With the deprecatedreportsparameter set to an empty string, any values in the reports settings inpuppet.confare removed.
Breaking Changes
>= 0.5.0Thesplunk_hec::urlparameter now expects a full URI of https://servername:8088/services/collector.0.5.0->0.6.0Switches to the fact terminus cache setting viasplunk_hec_routes.yamlto ensure compatibility with CD4PE. See Fact Terminus Support for guides on how to change it. Prior to deploying this module, remove the settingfacts_terminusfrom thepuppet_enterprise::profile::masterclass in thePE Masternode group in your environment if you set it in previous versions of this module (0.6.0 <). It will prevent PE from operating normally if left on.
Release Process
This module is hooked up with an automatic release process using Github actions. To provoke a release simply check the module out locally, tag with the new release version, then github will promote the build to the forge.
Full process to prepare for a release:
Update metadata.json to reflect new module release version (0.8.1).
Run bundle exec rake changelog to update the CHANGELOG automatically.
Submit PR for changes.
Create Tag on target version:
git tag -a v0.8.1 -m "0.8.1 Feature Release"
git push upstream --tags
Authors
P.I.E. Team
P. uppet\ I. ntegrations\ E. ngineering
Reference
Table of Contents
Classes
Public Classes
splunk_hec: Simple class to manage your splunk_hec connectivity
Private Classes
splunk_hec::v2_cleanup: Class to remove old configuration files
Functions
splunk_hec::secure: Custom function to mark sensitive data utilized by this module as Sensitive types in the Puppet language. Sensitive data is redacted from Pup
Plans
Public Plans
splunk_hec::examples::apply_example: Example of submitting a report from apply Function to Splunk.splunk_hec::examples::result_example: An example of submitting a Task or Functions results to Splunk as a Task.
Private Plans
splunk_hec::acceptance::oss_server_setup: Installs open source Puppet.splunk_hec::acceptance::pe_server_setup: Install PE Serversplunk_hec::acceptance::provision_machines: Provisions machinessplunk_hec::acceptance::server_setup: Install PE Server
Classes
splunk_hec
Simple class to manage your splunk_hec connectivity
Examples
include splunk_hec
Parameters
The following parameters are available in the splunk_hec class:
- Reference
- Table of Contents
- Classes
splunk_hec- Examples
- Parameters
urltokenfacts_allowlistenable_reportsrecord_eventdisabledonly_changesmanage_routesevents_reporting_enabledfacts_terminusfacts_cache_terminusfacts_blocklistpe_consoletimeoutssl_cainclude_system_cert_storefips_crl_checkfips_verify_peertoken_summarytoken_factstoken_metricstoken_eventsurl_summaryurl_factsurl_metricsurl_eventsinclude_logs_statusinclude_logs_catalog_failureinclude_logs_corrective_changeinclude_resources_statusinclude_resources_corrective_changesummary_resources_formatevent_typesorchestrator_data_filterrbac_data_filterclassifier_data_filterpe_console_data_filtercode_manager_data_filter
- Plans
url
Data type: Optional[String]
The url of the server that PE is running on
token
Data type: Optional[String]
The default Splunk HEC token Note: The value of the token is converted to Puppet's Sensitive data type during catalog application.
facts_allowlist
Data type: Array
The list of facts that will be collected in the report. To collect all facts available add the special value 'all.facts'.
Default value: ['dmi','disks','partitions','processors','networking']
enable_reports
Data type: Boolean
Adds splunk_hec to the list of report processors
Default value: false
record_event
Data type: Boolean
If set to true, will call store_event and save report as json
Default value: false
disabled
Data type: Boolean
Removes settings to send reports and facts to Splunk
Default value: false
only_changes
Data type: Boolean
When true, only reports with a changed status with be send to Splunk
Default value: false
manage_routes
Data type: Boolean
When false, will not automatically send facts to splunk_hec
Default value: false
events_reporting_enabled
Data type: Boolean
When true, will send data from PE Event Forwarding module to Splunk
Default value: false
facts_terminus
Data type: String
Ensure that facts get saved to puppetdb
Default value: 'puppetdb'
facts_cache_terminus
Data type: String
Makes sure that the facts get sent to splunk_hec
Default value: 'splunk_hec'
facts_blocklist
Data type: Optional[Array]
The list of facts that will not be collected in the report
Default value: undef
pe_console
Data type: String
The FQDN for the PE console
Default value: $settings::report_server
timeout
Data type: Optional[Integer]
Timeout limit for for both open and read sessions
Default value: undef
ssl_ca
Data type: Optional[String]
The name of the ca certification/bundle for ssl validation of the splunk_hec endpoint
Default value: undef
include_system_cert_store
Data type: Boolean
By default, the certificates in the local system cert store are ignored. To include these certificates for ssl validation of the splunk_hec endpoint set to True
Default value: false
fips_crl_check
Data type: Boolean
By default, the Puppet HTTP Client will attempt to check the Splunk CA against the Splunk CRL. Unless the Splunk HEC endpoint is configured with a certificate generated by the Puppet CA, set this parameter to false to allow metrics to successfully send.
Default value: true
fips_verify_peer
Data type: Boolean
By default, the Puppet HTTP Client will attempt peer verfication. When utilizing a self-signed certificate set this parameter to false to allow metrics to successfully send.
Default value: true
token_summary
Data type: Optional[String]
Corresponds to puppet:summary in the Puppet Report Viewer When storing summary in a different index than the default token Note: The value of the token is converted to Puppet's Sensitive data type during catalog application.
Default value: undef
token_facts
Data type: Optional[String]
Corresponds to puppet:facts in the Puppet Report Viewer When storing facts in a different index than the default token Note: The value of the token is converted to Puppet's Sensitive data type during catalog application.
Default value: undef
token_metrics
Data type: Optional[String]
Corresponds to puppet:metrics in the Puppet Report Viewer When storing metrics in a different index than the default token Note: The value of the token is converted to Puppet's Sensitive data type during catalog application.
Default value: undef
token_events
Data type: Optional[String]
When storing events from pe_event_forwarding in a different index than the default token Note: The value of the token is converted to Puppet's Sensitive data type during catalog application.
Default value: undef
url_summary
Data type: Optional[String]
Similar to token_summary; used to store summary in a different index than the default url
Default value: undef
url_facts
Data type: Optional[String]
Similar to token_facts; used to store facts in a different index than the default url
Default value: undef
url_metrics
Data type: Optional[String]
Similar to token_metrics; used to store metrics in a different index than the default url
Default value: undef
url_events
Data type: Optional[String]
Similar to token_events; used to store events from pe_event_forwarding in a different index than the default url
Default value: undef
include_logs_status
Data type: Optional[Array]
Determines if puppet logs should be included based on the return status of the puppet agent run Can be none, one, or any of the following: failed, changed, unchanged
Default value: undef
include_logs_catalog_failure
Data type: Boolean
Include logs if catalog fails to compile
Default value: false
include_logs_corrective_change
Data type: Boolean
Include logs if there is a corrective change Only a PE feature
Default value: false
include_resources_status
Data type: Optional[Array]
Determines if resource events should be included based on return status of puppet agent run Does not include 'unchanged' status reports Allowed values are: failed, changed, unchanged
Default value: undef
include_resources_corrective_change
Data type: Boolean
Include resource events if there is a corrective change Only a PE feature
Default value: false
summary_resources_format
Data type: String
If include_resource_corrective_change or include_resources_status is set and thus resource_events are being sent as part of puppet:summary events, then can choose format. Allowed values are: 'hash', 'array'
Default value: 'hash'
event_types
Data type: Array
Determines which events should be forwarded to Splunk Allowed values are: 'orchestrator','rbac','classifier','pe-console','code-manager'
Default value: ['orchestrator','rbac','classifier','pe-console','code-manager']
orchestrator_data_filter
Data type: Optional[Array]
Filters the jobs event data
Default value: undef
rbac_data_filter
Data type: Optional[Array]
Filters the rbac event data
Default value: undef
classifier_data_filter
Data type: Optional[Array]
Filters the classifier event data
Default value: undef
pe_console_data_filter
Data type: Optional[Array]
Filters the pe_console event data
Default value: undef
code_manager_data_filter
Data type: Optional[Array]
Filters the code_manager event data
Default value: undef
Plans
splunk_hec::examples::apply_example
Example of submitting a report from apply Function to Splunk.
Parameters
The following parameters are available in the splunk_hec::examples::apply_example plan:
plan_guid
Data type: Optional[String[1]]
A guid used to identify invocation of the plan (should change each run)
plan_name
Data type: Optional[String[1]]
The name of the plan being run (shouldn't change each run)
splunk_hec::examples::result_example
An example of submitting a Task or Functions results to Splunk as a Task.
Change log
All notable changes to this project will be documented in this file. The format is based on Keep a Changelog and this project adheres to Semantic Versioning.
Unreleased
2.1.0 (2025-06-03)
Fixed
- System metrics are now formatted with the metric name as the key and the metric value as the value. #220
2.0.1 (2024-11-26)
Fixed
- Ensure the report processor is using the correct file to retrieve the token value. #217
2.0.0 (2024-3-27)
Added
-
New parameters
token_eventsandurl_eventscan now be used to store events frompe_event_forwardingin a different index. #212 -
The parameter
ignore_system_cert_storeis now namedinclude_system_cert_storeand defaults to false. #208 -
Credential data provided to this module is now written to a separate configuration file utilizing the Sensitive data type to ensure redaction from Puppet logs and reports. #204
-
Configuration files created by this module are now placed in a
splunk_hecsubdirectory. #204 -
New private subclass
splunk_hec::v2_cleanupensures old configuration files are removed. #204 -
New custom function to convert sensitive user provided data from a String to Puppet's Sensitive data type. #203
-
Add support for Puppet 8. #200
Removed
- The deprecated
reportsparameter has been removed in favor of having the module automatically add the splunk_hec setting topuppet.conf. #212
Fixed
-
Bug fix preventing
sarmetrics collected bypuppet_metrics_collector::systemfrom being shipped to Splunk. #214 -
Removed logic preventing
job_idandcode_idfrom being added to report data. #213 -
The
collect_factsparameter has been renamed tofacts_allowlistto align with thefacts_blocklistparameter. #212 -
No longer utilizing
parse_legacy_metricsfunction for metrics collected with older versions ofpuppet_metrics_collector. #211 -
False positive when attempting to rescue required facts from an unconfigured
splunk_hec::facts_blocklist. #210 -
Settings are now removed from
puppet.confwhensplunk_hec::disabledis set to true. #205
v1.4.0 (2023-4-17)
Fixed
- Event filtering for
pe-consoleandcode-managerevents are no longer ignored. #196
v1.3.0 (2022-4-27)
Added
-
Added PE LTS version to testing matrix. #185
-
SSL config options for FIPS. #186
-
Ability to send reports that only contain changes. #187
Fixed
- Rescue required facts that have been added to the block list. #188
v1.2.1 (2022-3-14)
Added
- Allow rbac events to be disabled. #179
Fixed
-
Allow customer confdirs when using with pe_event_forwarding #180
-
Fix syntax error when ssl is enabled. #181
v1.2.0 (2022-2-16)
Added
- Ability to collect all facts against a blocklist. #170
Fixed
-
Prevent the
event_typesparameter from being configured unlessevents_reporting_enabledis set to true. #174 -
The
splunk_hec_agent_only_nodefact now properly resolves to false on infrastructure nodes running Puppet Server. #175 -
Prevent the deprecated
reportsparameter from removing configured settings inpuppet.conf. #176
v1.1.0 (2021-11-09)
Added
- Forwarding from Non Puppet Server nodes. #154
- Filtering of event types data. #156
- FIPS Compatability #159
v1.0.1 (2021-10-04)
Fixed
- Removed hardcoded certname in util_splunk_hec template. #149
- Updated sourcetype from common_events to pe_event_forwarding in util_splunk_hec template. #149
Added
- Added
event_typesparameter to limit the event types sent to Splunk. #152
v1.0.0 (2021-09-29)
Added
- Event Forwarding Processor to handle events from PE Event Fowarding. #142
v0.10.0 (2021-08-23)
Added
- Ignore System CA Certificate Store. #137
v0.9.2 (2021-08-02)
Fixed
-
Fixed sourcetypetime to allow metrics to be sent without issue. #135
-
Module metadata now supports latest versions of Puppet and Puppets Metrics Collector
v0.9.1 (2021-07-07)
Fixed
- Timestamp now matches timestamp value in the console #130
v0.9.0 (2021-06-29)
Fixed
-
Deprecation warning only when report parameter defined #85
Added
-
Added array resource format option #40
-
Added Puppet Alert Actions documentation to README.md #115 Thanks @coreymbe
-
Added splunk_hec disabling feature #120
Changed
-
Project issues URl changed in metadata to point to JIRA to create tickets instead of at github to create issues #62
-
Switch to the
pe_ini_subsettingresource for adding the report processor setting #51
Deprecated
- 'report' setting is now dynamically calculated. #49
v0.8.1 (2020-05-11)
Fixed
v0.8.0 (2020-05-07)
Fixed
- fix single quote issue in classifier #42 (mrzarquon)
- (PIE-178) Parse line-delimited JSON metrics #39 (Sharpie)
- PIE-178 Multiple Metrics in stdin #36 (mrzarquon)
v0.7.1 (2019-07-01)
Fixed
v0.7.0 (2019-06-25)
0.7.0 (2019-06-17)
Added
- Setup for github-changelog-generator #21 (HelenCampbell)
Fixed
0.6.0
(2019/06/13)
Changed
- The splunk_hec module now supports customizing the
fact_terminusandfacts_cache_terminusnames in the custom routes.yaml it deploys. If you are using a different facts_terminus (ie, not PuppetDB), you will want to set that parameter. Please note that this will come with a breaking change in functionality - Switches to the fact terminus cache setting via routes.yaml to ensure compatibility with CD4PE, see Fact Terminus Support for guides on how to change it.
0.5.0
(2019/06/11)
Added
- Advanced configuration for puppet:summary, puppet:facts and puppet:metrics to allow for the support of multiple indexes
- Additional documentation updates
- Added support for individual sourcetype urls
- Added ability to define multiple hec tokens on a sourcetype basis
- Addition of basic acceptance testing using Litmus
- The module is now under the power of the PDK
- Addition of the
saved_reportflag for the splunk_hec application - Allows the user to test some of the splunk_hec functionality, submits the result directly to the splunk configuration - Addition of the splunk_hec puppet face/app allowing for a cat json | puppet splunk_hec like workflow. The primary functionality of this code is to enable sending pe metrics data to Splunk using the current CS best practices for collecting the CS data.
- Major changes to module were done to enable the Fact Terminus:
- util/splunk_hec.rb created for common access methods
- consistent info and error handling for both reports and facts
- performance profile support for Fact Terminus
- Documentation updated with guide and default facts listed
- Module updated to optionally manage reports setting in puppet.conf
- Module updated to add new parameters and template values
- Fact collection time added to puppet report processor
- SSL handling and documentation improved
Fixed
- Minor fixes to output dialog
Changed
- url parameter now expects a full URI of https://servername:8088/services/collector
0.4.1
- A small maintenance release to fix some broken links in metadata
0.4.0
Initial release
- SSL checking of target Splunk HEC is possible
- Submits Puppet Summary report
- Tasks for Bolt Apply and Bolt Result included
- Example Plans for above included
* This Changelog was automatically generated by github_changelog_generator
Dependencies
- puppetlabs-puppet_metrics_collector (>= 6.0.0 < 9.0.0)
- puppetlabs-pe_event_forwarding (>= 1.1.0 < 3.0.0)
                                 Apache License
                           Version 2.0, January 2004
                        http://www.apache.org/licenses/

   TERMS AND CONDITIONS FOR USE, REPRODUCTION, AND DISTRIBUTION

   1. Definitions.

      "License" shall mean the terms and conditions for use, reproduction,
      and distribution as defined by Sections 1 through 9 of this document.

      "Licensor" shall mean the copyright owner or entity authorized by
      the copyright owner that is granting the License.

      "Legal Entity" shall mean the union of the acting entity and all
      other entities that control, are controlled by, or are under common
      control with that entity. For the purposes of this definition,
      "control" means (i) the power, direct or indirect, to cause the
      direction or management of such entity, whether by contract or
      otherwise, or (ii) ownership of fifty percent (50%) or more of the
      outstanding shares, or (iii) beneficial ownership of such entity.

      "You" (or "Your") shall mean an individual or Legal Entity
      exercising permissions granted by this License.

      "Source" form shall mean the preferred form for making modifications,
      including but not limited to software source code, documentation
      source, and configuration files.

      "Object" form shall mean any form resulting from mechanical
      transformation or translation of a Source form, including but
      not limited to compiled object code, generated documentation,
      and conversions to other media types.

      "Work" shall mean the work of authorship, whether in Source or
      Object form, made available under the License, as indicated by a
      copyright notice that is included in or attached to the work
      (an example is provided in the Appendix below).

      "Derivative Works" shall mean any work, whether in Source or Object
      form, that is based on (or derived from) the Work and for which the
      editorial revisions, annotations, elaborations, or other modifications
      represent, as a whole, an original work of authorship. For the purposes
      of this License, Derivative Works shall not include works that remain
      separable from, or merely link (or bind by name) to the interfaces of,
      the Work and Derivative Works thereof.

      "Contribution" shall mean any work of authorship, including
      the original version of the Work and any modifications or additions
      to that Work or Derivative Works thereof, that is intentionally
      submitted to Licensor for inclusion in the Work by the copyright owner
      or by an individual or Legal Entity authorized to submit on behalf of
      the copyright owner. For the purposes of this definition, "submitted"
      means any form of electronic, verbal, or written communication sent
      to the Licensor or its representatives, including but not limited to
      communication on electronic mailing lists, source code control systems,
      and issue tracking systems that are managed by, or on behalf of, the
      Licensor for the purpose of discussing and improving the Work, but
      excluding communication that is conspicuously marked or otherwise
      designated in writing by the copyright owner as "Not a Contribution."

      "Contributor" shall mean Licensor and any individual or Legal Entity
      on behalf of whom a Contribution has been received by Licensor and
      subsequently incorporated within the Work.

   2. Grant of Copyright License. Subject to the terms and conditions of
      this License, each Contributor hereby grants to You a perpetual,
      worldwide, non-exclusive, no-charge, royalty-free, irrevocable
      copyright license to reproduce, prepare Derivative Works of,
      publicly display, publicly perform, sublicense, and distribute the
      Work and such Derivative Works in Source or Object form.

   3. Grant of Patent License. Subject to the terms and conditions of
      this License, each Contributor hereby grants to You a perpetual,
      worldwide, non-exclusive, no-charge, royalty-free, irrevocable
      (except as stated in this section) patent license to make, have made,
      use, offer to sell, sell, import, and otherwise transfer the Work,
      where such license applies only to those patent claims licensable
      by such Contributor that are necessarily infringed by their
      Contribution(s) alone or by combination of their Contribution(s)
      with the Work to which such Contribution(s) was submitted. If You
      institute patent litigation against any entity (including a
      cross-claim or counterclaim in a lawsuit) alleging that the Work
      or a Contribution incorporated within the Work constitutes direct
      or contributory patent infringement, then any patent licenses
      granted to You under this License for that Work shall terminate
      as of the date such litigation is filed.

   4. Redistribution. You may reproduce and distribute copies of the
      Work or Derivative Works thereof in any medium, with or without
      modifications, and in Source or Object form, provided that You
      meet the following conditions:

      (a) You must give any other recipients of the Work or
          Derivative Works a copy of this License; and

      (b) You must cause any modified files to carry prominent notices
          stating that You changed the files; and

      (c) You must retain, in the Source form of any Derivative Works
          that You distribute, all copyright, patent, trademark, and
          attribution notices from the Source form of the Work,
          excluding those notices that do not pertain to any part of
          the Derivative Works; and

      (d) If the Work includes a "NOTICE" text file as part of its
          distribution, then any Derivative Works that You distribute must
          include a readable copy of the attribution notices contained
          within such NOTICE file, excluding those notices that do not
          pertain to any part of the Derivative Works, in at least one
          of the following places: within a NOTICE text file distributed
          as part of the Derivative Works; within the Source form or
          documentation, if provided along with the Derivative Works; or,
          within a display generated by the Derivative Works, if and
          wherever such third-party notices normally appear. The contents
          of the NOTICE file are for informational purposes only and
          do not modify the License. You may add Your own attribution
          notices within Derivative Works that You distribute, alongside
          or as an addendum to the NOTICE text from the Work, provided
          that such additional attribution notices cannot be construed
          as modifying the License.

      You may add Your own copyright statement to Your modifications and
      may provide additional or different license terms and conditions
      for use, reproduction, or distribution of Your modifications, or
      for any such Derivative Works as a whole, provided Your use,
      reproduction, and distribution of the Work otherwise complies with
      the conditions stated in this License.

   5. Submission of Contributions. Unless You explicitly state otherwise,
      any Contribution intentionally submitted for inclusion in the Work
      by You to the Licensor shall be under the terms and conditions of
      this License, without any additional terms or conditions.
      Notwithstanding the above, nothing herein shall supersede or modify
      the terms of any separate license agreement you may have executed
      with Licensor regarding such Contributions.

   6. Trademarks. This License does not grant permission to use the trade
      names, trademarks, service marks, or product names of the Licensor,
      except as required for reasonable and customary use in describing the
      origin of the Work and reproducing the content of the NOTICE file.

   7. Disclaimer of Warranty. Unless required by applicable law or
      agreed to in writing, Licensor provides the Work (and each
      Contributor provides its Contributions) on an "AS IS" BASIS,
      WITHOUT WARRANTIES OR CONDITIONS OF ANY KIND, either express or
      implied, including, without limitation, any warranties or conditions
      of TITLE, NON-INFRINGEMENT, MERCHANTABILITY, or FITNESS FOR A
      PARTICULAR PURPOSE. You are solely responsible for determining the
      appropriateness of using or redistributing the Work and assume any
      risks associated with Your exercise of permissions under this License.

   8. Limitation of Liability. In no event and under no legal theory,
      whether in tort (including negligence), contract, or otherwise,
      unless required by applicable law (such as deliberate and grossly
      negligent acts) or agreed to in writing, shall any Contributor be
      liable to You for damages, including any direct, indirect, special,
      incidental, or consequential damages of any character arising as a
      result of this License or out of the use or inability to use the
      Work (including but not limited to damages for loss of goodwill,
      work stoppage, computer failure or malfunction, or any and all
      other commercial damages or losses), even if such Contributor
      has been advised of the possibility of such damages.

   9. Accepting Warranty or Additional Liability. While redistributing
      the Work or Derivative Works thereof, You may choose to offer,
      and charge a fee for, acceptance of support, warranty, indemnity,
      or other liability obligations and/or rights consistent with this
      License. However, in accepting such obligations, You may act only
      on Your own behalf and on Your sole responsibility, not on behalf
      of any other Contributor, and only if You agree to indemnify,
      defend, and hold each Contributor harmless for any liability
      incurred by, or claims asserted against, such Contributor by reason
      of your accepting any such warranty or additional liability.

   END OF TERMS AND CONDITIONS

   APPENDIX: How to apply the Apache License to your work.

      To apply the Apache License to your work, attach the following
      boilerplate notice, with the fields enclosed by brackets "{}"
      replaced with your own identifying information. (Don't include
      the brackets!)  The text should be enclosed in the appropriate
      comment syntax for the file format. We also recommend that a
      file or class name and description of purpose be included on the
      same "printed page" as the copyright notice for easier
      identification within third-party archives.

   Copyright 2019 Puppet, Inc.

   Licensed under the Apache License, Version 2.0 (the "License");
   you may not use this file except in compliance with the License.
   You may obtain a copy of the License at

       http://www.apache.org/licenses/LICENSE-2.0

   Unless required by applicable law or agreed to in writing, software
   distributed under the License is distributed on an "AS IS" BASIS,
   WITHOUT WARRANTIES OR CONDITIONS OF ANY KIND, either express or implied.
   See the License for the specific language governing permissions and
   limitations under the License.